How to Create a Plate Wall Just Like an Interior Designer

After years of millennial gray and ultra-modern minimalism dominating the design space, people are craving cozy aesthetics with personalized touches and more maximalist tendencies. Think elaborate heritage-printed textiles, mix-matching vintage furniture, and leaning into saturated spaces. Hanging plates on walls falls right in line with all the above, and it’s the perfect way to showcase thrifted treasures or family heirlooms.
Keep reading to learn more about this trend, including how experts and interior designers curate and hang their own collections.
Hanging Plates on Walls: All About the Trend
Stephen Kent Johnson / Home of John Derian
Arranging plates on walls isn’t a new interior design trick, but it is one that we’ve seen fade from favor and then rise again. It’s rooted in nostalgia and gives license to a creative, bespoke aesthetic. Surprisingly versatile, the effect of decorative plates can range from funky eclectic grandma to understated and chic.
“Over the last few years, we’ve continued to see homeowners look for ways to add unique touches to their homes,” shares Gideon Mendelson, founder and creative director of Mendelson Group. “I think adding plates—especially heirlooms or vintage finds—provides a beautiful canvas for personalization. I also love that people are revisiting mixing old and new.”
Jacqueline Mersene, interior designer of Mersene Studios, agrees. She says your home is meant to be full of things that energize you and remind you of the best parts of life. Decorative plates are an adaptable addition, whether you’re hanging a thrifted score, a passed-down heirloom, or a piece you found while traveling.
How to Hang Plates on a Wall Like a Pro
Getty / Andreas von Einsiedel
Follow these simple steps to create a striking plate gallery wall. Alternatively, you can also set up freestanding or hanging shelves to display your set of decorative plates.
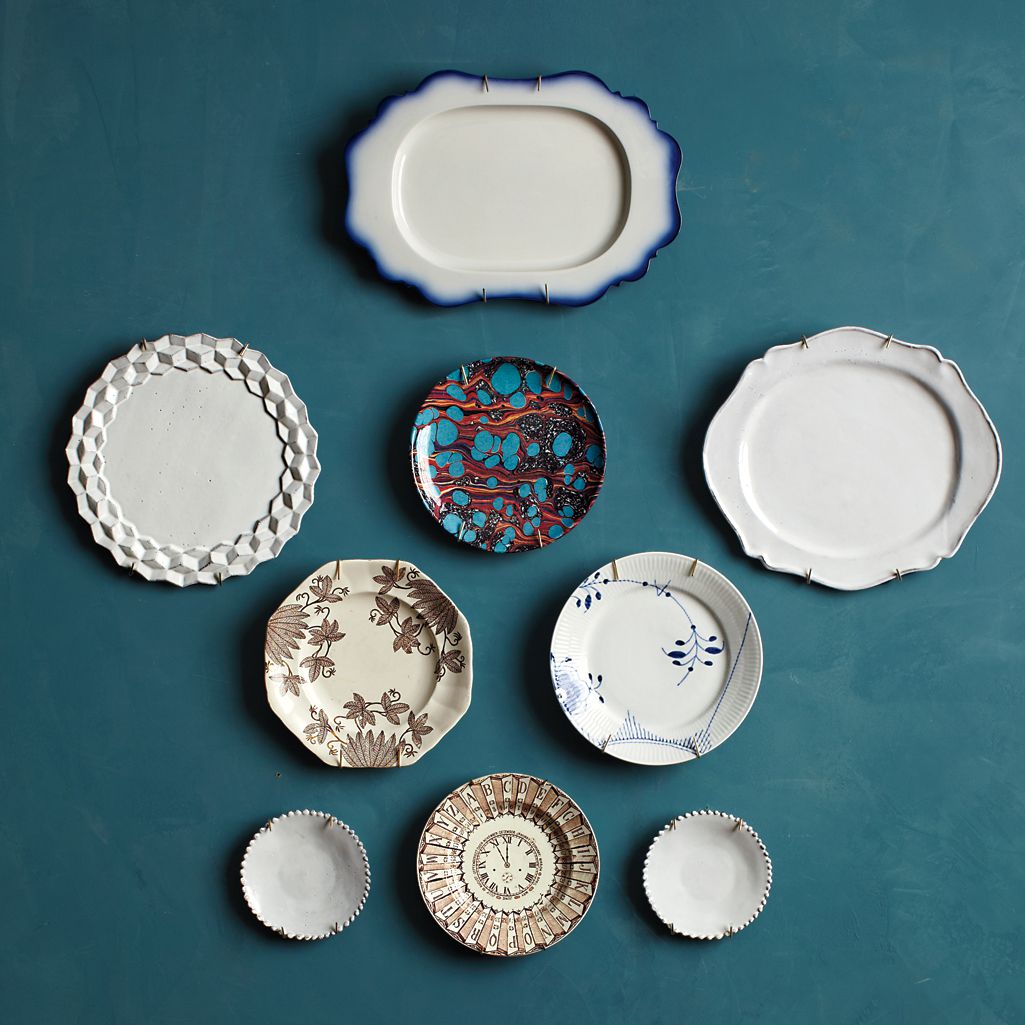
Step 1: Curate Your Plates
The goal when building a plate gallery wall is to prioritize pieces that feel personalized, special, and have some sense of a through-line. According to Mersene, the first rule of interior design is that you make the rules. “Feel free to be as bold as your heart desires with your combinations, but make sure the arrangement feels intentional,” she advises.
Flatter, shallow plates are easier to hang and will be more stable on the wall.
“A great approach is to choose plates within a cohesive color scheme or, at a minimum, balance ornate designs with more minimal ones to create harmony.”
Step 2: Choose Where to Hang Them
Eric Piasecki / Mendelson Group
Scout your space to find a good place for your plate gallery wall to live. The kitchen or dining room is a natural option given the theme (dinnerware!)—but hallways, bathrooms, living rooms, and bedrooms all work.
Your decorative plates can serve as an entryway focal point, a striking headboard replacement, or a bathroom showpiece. Just make sure that they’re either up high enough or the space has enough clearance to avoid the pieces being accidentally bumped.
Step 3: Configure Your Arrangement
Once you have your pieces and the wall chosen, lay the plates all out in front of you to figure out the best arrangement. “Play with different combinations to see what feels good to you. I love to lay them all out on the floor and rearrange them until a certain scheme feels right to my eye and to my heart,” says Mersene. Take a picture of your arrangement so you have it handy for the next step.
Step 4: Transfer the Design to Your Wall
Thomas Northcut / Getty Images
Before hanging plates, map out your arrangement on the wall. Use a measuring tape and level to ensure even spacing, marking key points lightly with a pencil. For extra guidance, painter’s tape can help outline plate positions before committing to nails or adhesive.
Step 5: Hang the Plates
Now it’s time to hang your plates on the wall. Start with the central plate and work outward from there, referencing your original layout as you go. Double-check alignment as you hang each piece to maintain balance.
Mendelson’s preferred method is plate hangers, like Michael’s Studio Décor Plate Hanger. These work by snuggly stretching over the plate and include a piece that allows you to hang the plate with a hook or nail. Such supports are widely available and come in different sizes, so choose one that is compatible with your plate’s diameter.
Alternatively, you can try adhesive disc hangers, plate racks, or heavy-duty Command Strips. For a decorative touch, use ribbon or wire to hang plates with built-in holes or discreet hooks. Whichever method you choose, double check that the plates are securely fastened to prevent falls.
Step 6: Make Any Adjustments
Check your plate gallery for anything that feels unbalanced. Add, subtract, or replace pieces until the design feels right to you. Mendelson says, “I like to play around with different sizes to create a clear focal point and visual interest.”
Remember, there are no hard rules, so tap into your own creativity to nail the perfect plate gallery wall.