I Tried Selena Gomez’s “Velvet” Nails With the Help of Her Manicurist

:upscale()/2025/03/26/546/n/1922153/tmp_TOsgqE_a1ed9350e66bf246_2_Up_Side_by_Side_-_Blue-2-Main_-_2_Up_-_Blue.png)
Is there anyone who doesn’t love the soft, luxe feeling of velvet? We’ll wait. The plush textile has taken center stage this year, its comeback aligning with a larger shift toward tactile luxury and a craving for materials that feel as indulgent as they look. With velvet being embraced across fashion, interior design, and accessories, it comes as no surprise that it’s inched its way into the beauty scene, too, particularly when it comes to nails.
Velvet nails are meant to mimic the soft, reflective quality of actual velvet fabric, and with Selena Gomez a big fan of the look, I knew I had to try it out for myself. Historically, I’m not very adventurous when it comes to my manicures (I typically alternative between a solid pink and a solid white), but when the opportunity arises to get your nails done by Tom Bachik, the nail creative behind some of the industry’s biggest A-listers (I’m talking Beyoncé, Jennifer Lopez, and Gomez herself), I couldn’t decline. Bachik gave me velvet nails using the new Olive & June Magnetic Gel System ($50), which features four new velvet polishes that are as user-friendly to apply as they are gorgeous.
Below, I’ll share my experience getting my nails done using the new collection.
How the Magnet Manicure Works
:upscale()/2025/03/26/547/n/1922153/tmp_fBiY8J_0576d27f0d3aba66_8_-_Applying_Velvet_Polish.png)
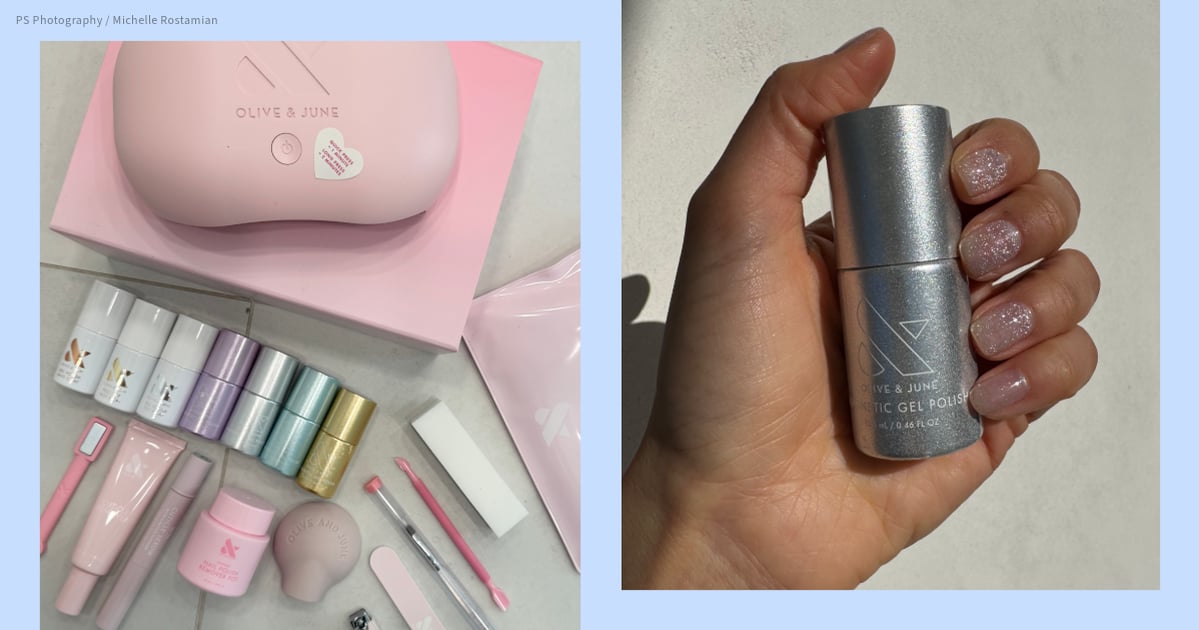
Olive & June’s Magnetic Gel Mani System comes with everything you need to create a velvet manicure, including a base coat, top coat, LED gel lamp, all four polishes (sheer silver, sheer gold, pastel lavender, and pastel blue), and all of the necessary tools (magnetic wand, nail file, nail buffer, nail clipper, and cuticle remover). What makes this system so unique is the magnetic wand and corresponding polishes — the particles in the nail polish are metal, so when you hold the magnetic wand to the nail, the polish rises to give a reflective, velvet-y look (more on that later).
The manicure began with Bachik removing my old gel polish using an electric nail file — he made sure to move in the direction of nail growth to maintain the integrity of my nails. He then trimmed, filed, and pushed down my cuticles before going in with a lint-free, alcohol-soaked pad to cleanse the nail. He applied a thin layer of base coat (a thick coat can make the nail appear flatter and thicker, he says) and brushed off any excess that may have gotten on the skin around my nails. We let the base coat sit under the LED gel lamp for one minute, then came the fun part — the magnetic polish.
Here’s how it works: The magnetic wand is dual-ended with a rectangular and circular side. Depending on which end you use (and the angle in which you hold the wand), you can achieve different finishes. For instance, waving the rectangular end of the wand over each nail gives an all-over opalescent velvet effect. If you hold the rectangular end of the wand at a diagonal angle above the nail, you’ll get a diagonal cat-eye look. You can also create a french tip by placing your finger over the magnet as you paint the tip with the polish. If you want to experiment with different designs while you’re painting (or you mess up and need a re-do), you can simply reset by adding another layer of polish (the polish won’t set in its design until you cure it under the light, so there’s some wiggle room to play around).
:upscale()/2025/03/26/548/n/1922153/tmp_g1WFyD_823bb327abffe459_IMG_6522.gif)
My Velvet Nails
Bachik and I played around with different looks and each one we tried created a velvet effect that looked stunning as it caught the light. It was tough making a decision on what to go for, but we ended up using the sheer silver polish to create an all-over shimmering effect.
One technique Bachik taught me about was “freezing” the gel. After painting one or two nails and creating the effect we wanted with the magnetic wand, he had me put those nails under the LED light for 10 seconds. This “freezes” the particles, which ensures the already-painted nails don’t get ruined as he works on my other fingers. This technique works for any type of manicure, but it’s especially helpful when working with magnetic polishes specifically — if you don’t “freeze” the magnet effect in place and begin working on other fingers, the magnet can accidentally catch onto the completed nail and change its effect.
Once all of the nails were finished, I put them under the LED light for one minute, Bachik applied the top coat, and then we let the nails sit under the LED light for another two minutes for the final cure. Bachik then used a small brush and 100 percent acetone to clean up the edges. The final step to any good manicure is moisturizing because acetone can be dehydrating on the skin and nails.
All in all, I love the gorgeous shimmery effect this collection gave my nails — I definitely feel ready for the red carpet.
:upscale()/2025/03/26/547/n/1922153/tmp_oksUDv_7e1529ad4b7afa7a_IMG_6606.gif)
Michelle Rostamian is a Los Angeles-based beauty and wellness contributor with over 10 years of experience in the industry. She began her career as a publicist, content writer, and social media manager, representing beauty brands and industry professionals. Currently, she is a writer and editor on all things makeup, beauty, skincare, and lifestyle.